


In this post, I will show you how to create a database using DBCA |
| In this screen we will start the database creation by calling DBCA |
In this screen, we can see that I have set the database environment variable and then invoked the dbca binary executable.

In this screen, we can see multiple options and each option has its own work
Option #1 - will be used to create a fresh database in the server
Option #2 - will be used to make some changes to the existing databases on the server
Option #3 - will be used if we want to delete any database.
Option #4 - will be used to make some changes in the templates [ templates are the skeleton ]
Option #5 - will be used to make changes in the pluggable PDB databases
Option #6 - used to manage RAC instances

After choosing the first option in the previous screen we can see two types of configuration
1. Typical
2. Advanced - this allows us to define multiple things at deep level

In this screen, we can choose which type of database we need Single or RAC and we can also choose template like OLTP or DWH or CUSTOM [ in step 1 we can manage these templates ]

In this screen we will give the name to the database, the global database name is the complete name with the domain name. SID is the system Identifier name. Here we have an option to create a CONTAINER database or not by clicking the checkbox and if we create a container database we have an option to create a PLUGGABLE database or not. But we will see major difference in 21c database installation.

In this screen, we can see that we have an option to go with the OLTP templates setting or we can choose manually like database file storage type can be filesystem or ASM (automatic storage management). The database data files will go to the ORADATA location inside the ORACLE_BASE if the filesystem is chosen. We can also see the option of OMF (oracle managed files) basically this will ease the management of the data files ( like giving names to datafiles )

In this screen, we are specifying the location for FRA (fast recovery area or flash recovery area) and size of the FRA. This area will be used to keep the archives or the flashback logs or the backupsets.

In this screen, we can see that Oracle has defined minimal size for FRA and if the FRA size is less it will throw the error. Oracle recommends having the 3X the database size as the FRA size.

In this screen also, we can see that Oracle has defined minimal size for FRA and if the FRA size is less it will throw the error. Oracle recommends having the 3X the database size as the FRA size.

In this screen, oracle gives us the option to create a separate new LISTENER on a non-default PORT

In this screen, we have created a new listener LIST_ORCL and running on default port 1521. I will suggest choosing a different PORT as 1521 is more vulnerable to hackers

In this screen, we can provide details for the Oracle database vault or Oracle Lable security. In our case, we are not using them so we leave them blank.

In this screen, we can choose different types of memory allocation ASMM or AMM or MANUAL

In this screen, we can choose the No of Process. Here we don't have the option to change the oracle default block size of 8k

In this screen, we have to choose the right CHARACTERSET [ it is better to choose AL32UTF8 if you don't know which one to choose ]

In this screen, the connection mode tab allows us to choose between DEDICATED or SHARED server mode. Now days we go with dedicated

In this screen, we can checkbox the option if we want to have default schemas installed.

In this screen, we see two options one to go with default EM running on Port 5500 or we can provide the EM cloud control details. EM is a database monitoring tool

In this screen, we have to choose the PASSWORD for users like SYS, SYSTEM, PDBADMIN for simplicity we can choose the same password for all.

In this screen, we have 3 options
Option #1 - create the database with all the setting as specified on previous pages.
Option #2 - we can save the settings as a new template
Option #3 - we can create the database creation script
By clicking on the Init Parameters we can see all the parameters set for the database.

In this screen customized storage, we can see the control file and redo log files locations and we can edit it if needed.

In this screen customized storage, we can see the redo log files parameters and we can edit it if needed.

In this screen customized storage, we can see the data files locations.
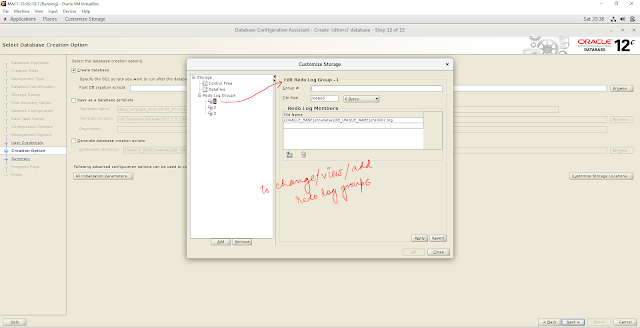
In this screen customized storage, we can add/remove redo log files or groups

In this screen, we have 3 options
Option #1 - create the database with all the setting as specified on previous pages.
Option #2 - we can save the settings as a new template
Option #3 - we can create the database creation script

In the summary page, we can save the RESPONSE file which we can use to create the database in SILENT mode
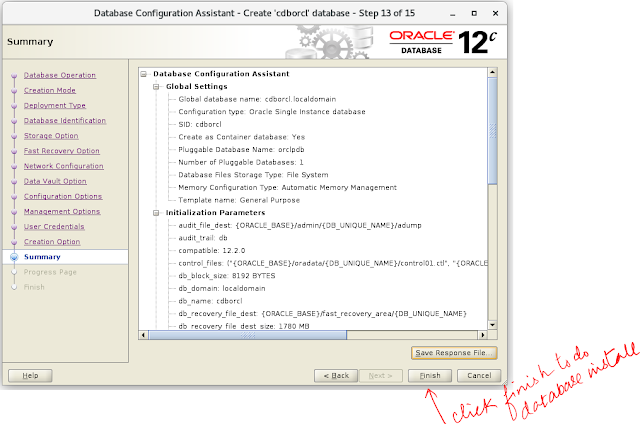
Click on the FINISH button to start the database installation.

In this page we can see the database creation progress. we can also go to the cfgtoollogs to check the logfiles.

we can also check the alert log file.

In this screen, we can see important information like Database name, SPFILE location, EM server URL. we can also change the password of the database users by clicking on the Password Management button.
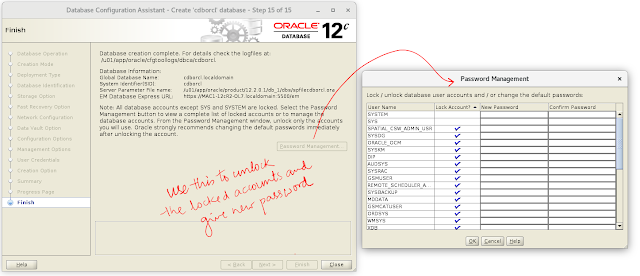
we can change the password of the database users by clicking on the Password Management button.

using the Linux OS command 'ps -ef|grep -i pmon' we can check which database is running

we can connect to the database using the 'sqlplus / as sysdba' command and use the query 'SELECT NAME,OPEN_MODE,DATABASE_ROLE FROM V$DATABASE' to check the database status. To connect to the Pluggable we use the command 'ALTER SESSION SET CONTAINER=<PDB_NAME>'

To check the LISTENER status we will use the command 'LSNRCTL STATUS <LISTENER_NAME>'
The listener name is the same that we have given in STEP 7 and we can see to which database it is listening to.
I hope this post on database creation will help the #oracleLearners :)
